
I’ve been doing my own gel nails at home for years, and if there’s one thing I’ve learned, it’s this:
Removing gel properly matters just as much as applying it properly.
When I first started doing my own nails, removal always felt like the annoying part. Gel can be stubborn, soaking takes time, and it’s very tempting to start peeling or scraping when a corner begins to lift.
These days, I don’t use the exact same removal method every time.
It depends on how thick my gel is, what type of base I used, and how quickly I want to change my nails.
Sometimes I file down the bulk and soak the rest off with acetone. Sometimes I use my nail drill. And lately, one of my favorite options is starting with a peel-off base gel so removal is much easier later.
Here’s exactly how I do it.
First: Please Don’t Just Peel Your Gel Off
I know it’s tempting.
Once one little corner starts lifting, suddenly you want to peel the entire thing off.
Try not to.
Gel polish can take layers of the natural nail with it when it’s forcibly peeled off. The American Academy of Dermatology also recommends resisting the urge to pick gel polish off and describes acetone soaking as a removal option.
So if regular gel doesn’t want to come off easily, I don\’t force it.
I either file and soak it or, if I’ve planned ahead, use a peel-off base system.
Method 1: For Thick Gel, I File First and Then Soak
If I’ve done a thicker set—especially when there are several layers of product—I don’t immediately wrap my nails in acetone.
It takes forever.
Instead, I use my nail drill to carefully remove some of the bulk first.
The important part is that I’m not trying to drill all the way down to my natural nail.
I mainly want to break through the top coat and remove enough thickness so the acetone doesn’t have to fight through all those layers.
Once I’ve filed the product down, I switch to acetone.
How I do my acetone soak-off
I usually
- File away the shiny top layer and some of the bulk.
- Put acetone on cotton.
- Place the cotton directly over the gel.
- Wrap each fingertip with foil.
- Let the acetone soften the remaining product.
- Check the gel and gently remove what’s already loosened.
If some gel is still firmly attached, I don’t aggressively scrape at it.
I’d rather wrap it again for a little longer.
That’s one of the biggest changes I’ve made over the years: I stopped trying to rush removal.
Method 2: Sometimes I Use My Nail Drill
For a regular set that isn’t extremely thick, I sometimes remove most or all of the gel with my nail drill.
But there’s an important disclaimer here:
I would not recommend learning gel removal by drilling all the way down to your natural nail if you’re a complete beginner.
A nail drill is fast, but that’s also exactly what makes it easy to go too far.
You need to know when you’re approaching the base layer and when to stop.
If you’re not comfortable controlling an e-file yet, I think filing away the top layers and finishing with an acetone soak is the safer, less stressful option.
There’s no prize for removing a manicure five minutes faster.
Method 3: My Favorite Shortcut Is Actually a Peel-Off Base Gel
This is the method I’ve been enjoying the most lately.
And technically, easier removal starts before I even apply my color.
I use a peel-off base gel.
I used to associate peel-off bases with temporary manicures—the kind you use when you only want your nails to last a short time because the polish starts lifting quickly.
Newer peel-off gel products have changed my opinion.
The one I use can last surprisingly well on my nails, but when I’m ready for a new set, I don’t have to go through the same filing and acetone process.
For someone like me who enjoys changing gel nails at home, that’s a huge convenience.
The Peel-Off Base Gel I Personally Use
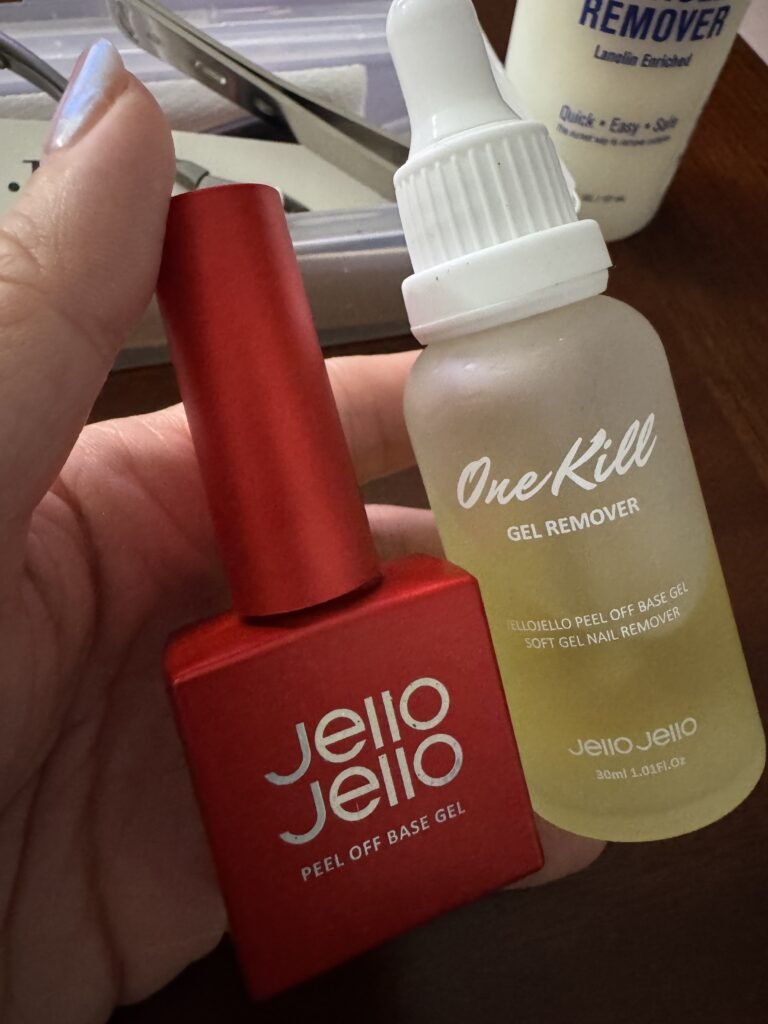
My favorite is JELLO JELLO Peel Off Base Gelhttps://amzn.to/3RRbytA, a Korean peel-off gel system.
This isn’t something I’m mentioning just because I needed a product for this post. It’s one I actually use and really like.
What I especially like is the removal process.
I use the peel-off base together with the JELLO JELLO peel-off remover, which helps loosen the gel instead of making me force it off.
I work the remover around the edges, give it time to get underneath the product, and then gently lift the gel as it loosens.
For me, this has been a completely different experience from simply grabbing a lifted corner and peeling regular gel off.
In my personal experience, I haven’t noticed damage to my natural nails when I’ve removed my manicure using this system.
That’s one of the biggest reasons I like it.
Of course, everyone’s nails are different, and wear time and removal can depend on your nail preparation, application, natural nails, and how you use the product.
But on my own nails, it has worked extremely well.
Affiliate disclosure: If you purchase through my Amazon link, I may earn a small commission at no additional cost to you. I only mention this product because it’s one I personally use.
So Which Removal Method Do I Use Most?
Honestly, all three.
I don\’t think there’s one removal method that makes sense for every manicure.
If my gel is really thick, I usually remove some of the bulk with my drill and finish with an acetone soak.
If it’s a normal gel set and I’m comfortable with what I’m doing, I may use my drill for more of the removal.
And if I know from the beginning that I’ll want an easy removal later, I reach for my peel-off base gel.
That’s probably my favorite lesson from doing my own nails:
You don’t have to make removal difficult in the first place.
A Few Things I’ve Learned From Removing My Own Gel Nails
The biggest one is patience.
If the gel isn’t ready to come off, forcing it usually isn’t worth it.
I’ve also learned not to treat my nail drill like an eraser. The goal isn’t to remove every microscopic bit of product as quickly as possible.
And if I’m using acetone, I’d rather soak a stubborn nail again than start aggressively scraping.
Finally, choosing the right base before doing your manicure can make a huge difference later. That’s something I didn’t appreciate nearly as much when I first started doing my own nails.
What I Would Recommend for a Beginner
If you\’re brand new to doing gel nails at home, I would keep removal simple.
For traditional soak-off gel, carefully file through the top coat and use the acetone-and-foil method rather than trying to master full e-file removal immediately.
Once you’re comfortable using a nail drill and understand how the different layers look and feel, you can decide whether you want to incorporate it more into your routine.
And if you’re someone who loves changing nail designs often, a good peel-off base might be worth trying.
It has made my own routine much easier.
Final Thoughts
There are plenty of ways to remove gel nails at home, and after doing my own nails for years, I’ve stopped believing that I need to use the same method every single time.
I look at the manicure I have in front of me.
Thick gel? File down the bulk and soak.
Regular gel? I may use my drill, depending on the set.
Want the easiest removal next time? I’ll start with my peel-off base.
The one thing I don’t do is intentionally rip regular gel off my natural nails just because it starts lifting.
Taking a little more time during removal—or planning for easier removal before the manicure even starts—has made doing my own gel nails at home much more enjoyable.
And for me, my natural nails are much happier for it.
This post is based on my personal experience doing gel nails at home and is provided for general informational purposes. Individual results may vary. If you experience nail pain, significant thinning, discoloration, swelling, or other nail problems, consider stopping nail products and consulting a qualified healthcare professional.